BabyDrummer
Drum Pattern Sequencer
User's Manual
BabyDrummer is a versatile and easy-to-use pattern-based drum sequencer. With BabyDrummer you can design and play back your fantastic drum patterns in an arbitrary order.
BabyDrummer does not have a built in drum sampler so you need to use one in conjunction with it. A very nice choice might be Sitala by Decomposer which is totally free and yet covers all you need and even more. Simply place BabyDrummer before Sitala (or any other drum sampler) in the effects chain so that its output goes directly into the sampler. Although the interface of BabyDrummer might look intimidating at first it is in fact very simple and shows everything you need to see when designing a pattern.

- open an existing drum project,
- save the current one and
- reset all by clearing the project.


- clear the current pattern,
- copy the current pattern to the clipboard,
- paste a previously copied pattern (and overwrite the current one).
- to record drum hits to the current pattern by hand click on the Rec button and then hit the keys / pads on your midi controller that belong to the desired drums as the play heads cycle around. Press the Rec button again to stop recording,
- hit the Play button to continuously play back the current pattern directly from the plugin (hotkey: Backspace). To stop the playback click the button again.
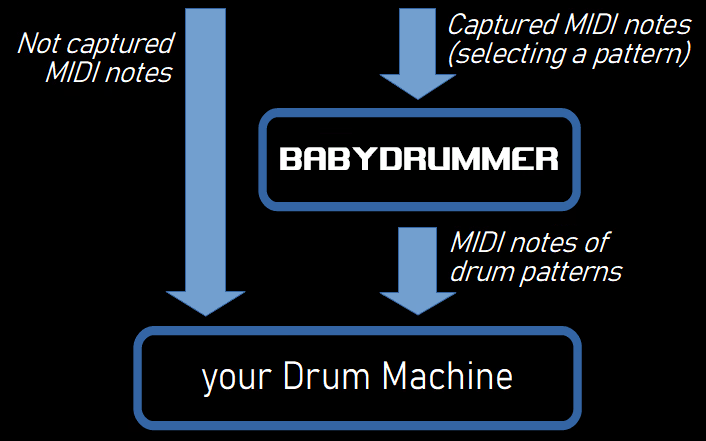
Note that you will use this function mainly during the editing process. You might want to control pattern playback from the host by sending MIDI notes to BabyDrummer. Each MIDI note will select the corresponding pattern and keep it playing while the note lasts.
During recording and playback the pattern selector controls are disabled, you cannot change the current pattern manually.
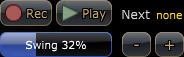
- Select a note for the Next pattern to chain more patterns together. BabyDrummer will automatically start playing the chained pattern when the current pattern ends and the controlling note is still on,
- the slider called Swing is the classic swing control: 0% means regular 1/16 intervals, while 100% means that every even hit will be shifted halfway towards the next (odd) hit. The swing value you set here will affect the entire playback (all patterns),
- the (+) and (-) buttons add / remove drum lanes to the current pattern (see below). There can be 16 drum lanes in a pattern.
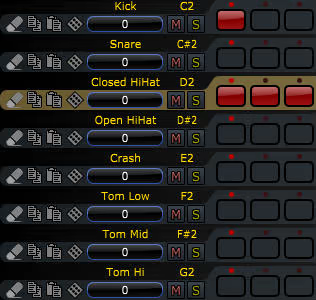
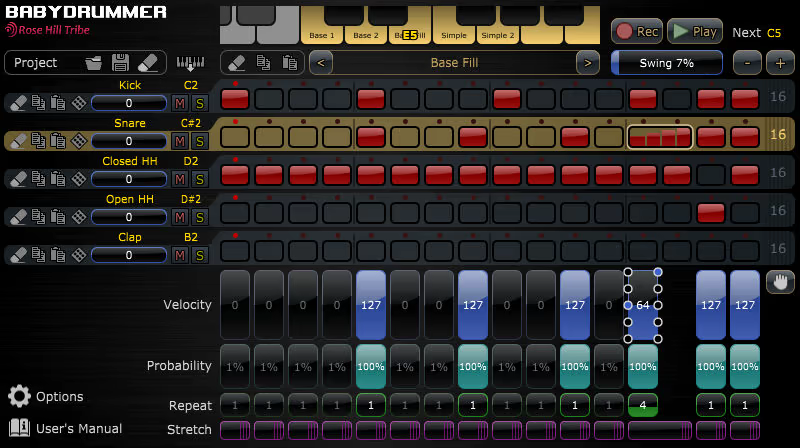
The middle section shows the current pattern. There are 8 lanes, each represents a unique drum and has 16 steps (1/16th note each). The selected step is marked by a white rectangle, the current lane is highlighted.
Each lane has separate controls for manipulating its content: use the small icons to the left to
- clear the lane,
- copy and paste lane contents,
- fill the lane with a random pattern,
- the blue slider can shift the drum hits of the lane in time in both directions (the value
+/-100 means a +/-1/32th note shift).
Be careful! If you use a negative value, the hit in the first position will be suppressed when the pattern playback has just begin (when you first play that pattern directly from the plugin or the pattern was just selected by the host).
- the Mute button will mute the corresponding lane,
- the Solo button will solo the lane,
- click on the text field above the shift slider to give a name to the lane (e.g. enter the drum name here),
- click on the note name to preview the drum that belongs to this lane,
- to change the note of a lane and so assign a different drum to it, either
- select the lane and then click on the MIDI learn icon above the lanes panel, right above the note fields. The note starts flashing. Now use your MIDI controller to set the new note. If you finished selecting the new drum the flashing of the note will stop after a few seconds; or
- right click on the note and select the new note from the popup list.
The little red dots are showing the position of the play heads. They start moving when the playback starts.
You can draw a new drum in the drum hit matrix by clicking on an empty rectangle. You can clear an existing drum hit the same way. To draw or clear more than one hits at once, simply drag the mouse inside the lane.
If you are into polyrhythms, you can drag the handler at the end of the lane to set the number of steps. During playback the play heads of shorter lanes start again when reaching the last step - regardless of the position of other play heads. This way you can make nice variations within the same pattern.
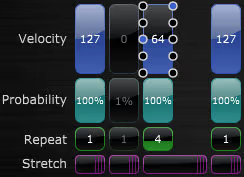
- here you can set the velocity of each drum;
- by default all drum hits are always played during playback. You can make the pattern more interesting by increasing its randomness. To achieve that reduce the Probability parameter of some of the drum hits. The lower the value the lower the probability of sounding that specific drum hit. A decreased probability value is also shown in the hit matrix: the drum hit becomes shorter;
- if you need more dense hits here and there you can increase the repeat parameter of a hit. If you increase the repeats of a hit, the drum hit matrix will also reflect the setting by dividing the hit into several parts. If the repeat count is more than one then a few circles appear around the current velocity slider. You can click on the 5 different circles on the left to set the starting velocity of the repeat (which can be 127, halfway to the current velocity, the current velocity, halfway to 0, 0) as well as 5 circles on the right to set the ending velocity;
- if you want a repeat to last longer than just one hit, simply drag the Stretch bar of the hit across its neighbors.

Any of the above sliders can be set by clicking (and then optionally dragging) the mouse. If you need more precision setting a value, hold down the shift key while clicking and dragging. You can set multiple values at once if you drag your mouse across multiple sliders.
You can click the Drag button located right to the Velocity sliders and drag your mouse to the desired MIDI track in your DAW to render the current pattern. If lane lengths are different (so you created a polyrhythm) the pattern will be repeated until all play heads meet again at the beginning of the pattern.
Open the Options panel to set the capture notes interval or click on the Show Hints switch to turn on and off the hints displayed when the mouse is over a control.
Finally the User's Manual link takes you to the manual page any time.
THE FINAL SECRETS REVEALED:
Hot Keys
Here is the complete list of BabyDrummer hot keys to further boost your productivity:
Arrow keys - move the selection in the drum hit matrix
Return - toggle the currently selected drum hit on/off
Ctrl + Left/right Arrow keys - change the length of the selected lane
Ctrl + Up/down Arrow keys - move the selected lane up/down
Shift + Left/right Arrow keys - move contents of the selected lane left/right
Plus / Minus - change the velocity of the selected drum hit
Shift + Plus / Minus - change the velocity of all drum hits in the selected lane
Ctrl + Plus / Minus - doubles / halves the content of the current lane
S - solo the selected lane
M - mute the selected lane
Page Up - display the previous pattern
Page Down - display the next pattern
Backspace - plays the current pattern in a loop